Connection Options
Connecting to your database from Beekeeper Studio is easy. You can connect to a database in a few different ways:
- For SQLite databases, you can simply double click the file in your file browser
- For other databases, you can specify host & port, or the unix socket path.
- Some cloud vendors support connecting with custom authentication methods, Beekeeper Studio supports many of these too (eg: SSO for Azure SQL).
First Step: Select Connection Type
When you open Beekeeper Studio for the first time, you'll see the connection screen. You can select the type of connection you want to make from the dropdown.
You can also import a database URL here, this is super useful for Heroku Postgres, Azure SQL, and other cloud databases.
Optional: Explore The Demo Database
Every new Beekeeper Studio installation comes with a Demo Database in the right side menu. This is a small SQLite database we bundle with the app. You can use this to explore Beekeeper Studio's features without connecting to a real database.
Complete
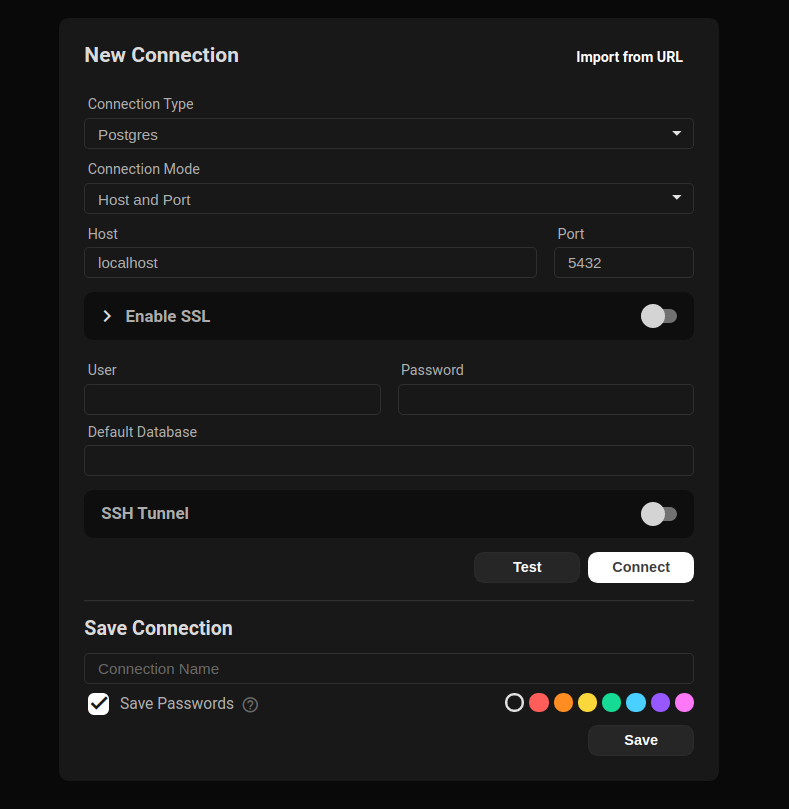
The Beekeeper Studio Connection Screen
Connection Mode
You can connect to some databases with either a socket or a TCP connection. Socket connections only work when the database server is running on your local machine (it's the default set-up for a MySQL installation for example). TCP connections require a hostname and port.
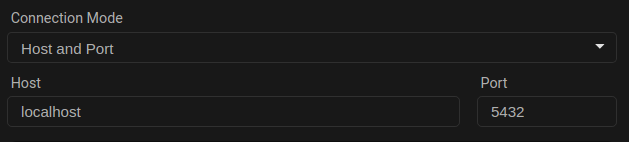
TCP (Host/Port) connection example
Note that SSL, SSH, and other advanced connection options are only available with a TCP connection.
SSL
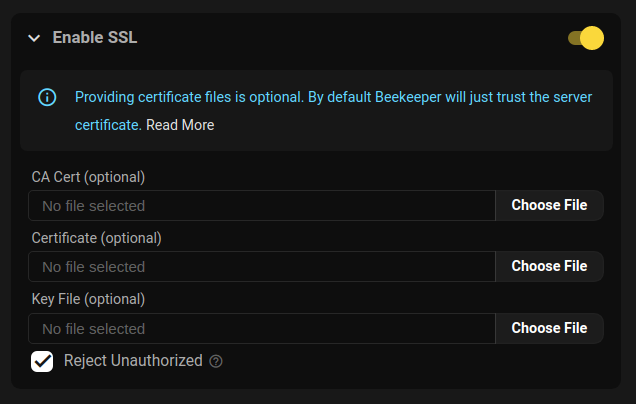
Beekeeper Studio's SSL Configuration
There are three ways to connect to a database with SSL
- Trust the server: Connect with SSL without providing your own certificate. This is the default.
- Required Cert: Connect with SSL, provide your own certs, and disable
rejectUnauthorized. - Verified Cert: Connect with SSL, provide your own certs, and enable
rejectUnauthorized.
Here's a table of how the various sslmode flags from command line clients map to Beekeeper:
| sslmode | Turn on SSL? | rejectUnauthorized |
|---|---|---|
| disable | no | n/a |
| allow | no | n/a |
| prefer | no | n/a |
| require | yes | false |
| verify-ca | yes | false |
| verify-full | yes | true |
You can provide your own custom certificate files if needed.
SSH
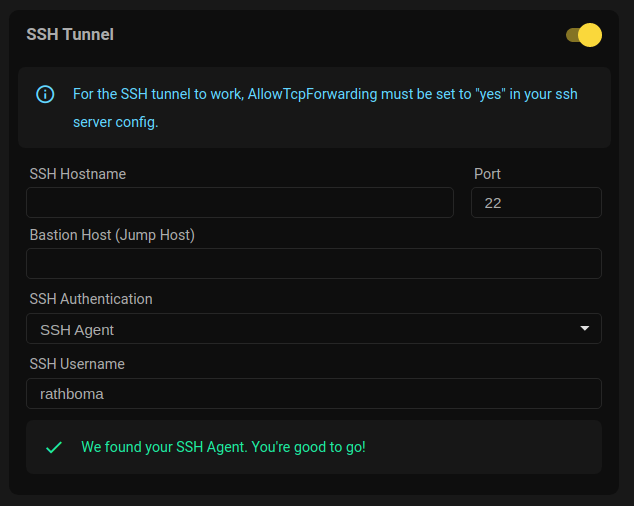
Beekeeper Studio's SSH configuration
Server Configuration
Before you can use an SSH tunnel to connect to your database, you need to make sure your SSH server is setup correctly.
Firstly make sure the following line is set in your /etc/ssh/sshd_config:
AllowTcpForwarding yes
ssh-rsa public keys
If you are using an ssh key generated by the ssh-rsa algorithm, you'll need to enable support for this algorithm in your ssh server.
To do this, you can add the following line to the /etc/ssh/sshd_config file on your SSH server
PubkeyAcceptedKeyTypes +ssh-rsa
Yes, the
+ is intentionalClient Configuration Options
Beekeeper supports tunneling your connection via SSH. To connect to a remote database using your SSH account on that machine:
-
Activate the SSH Tunnel to reveal the ssh connection detail fields
-
Enter the SSH Hostname or IP address of the remote SSH server
-
Change the SSH server's Port if it doesn't accept connections on the default port 22
-
Enter Bastion Host (JumpHost) (optional) if your server's network requires that you connect through a JumpHost
-
Enter the Keepalive Interval (optional) to specify, in seconds, how often to ping the server while idle to prevent getting disconnected due to a timeout. This is equivalent to the ServerAliveInterval option you might use on the ssh command line, or in your
~/.ssh/configfile -- Entering 0 (zero) disables this feature -
Select your SSH Authentication method:
-
Automatic(default) — Beekeeper picks the right key for you, in the same ordersshitself does. See below. -
Key File— pick a specific SSH Private key File (and optionally enter the Key File PassPhrase). Use this when you want to override Automatic and authenticate with one specific key. -
Username and Password— enter both your SSH Username and SSH Password.
-
-
Enter a name for your Connection (optionally check the Save Passwords checkbox) and Press Save to have Beekeeper remember all of the above for you
-
Press the Connect button to access your database!
Automatic authentication (default)
In Automatic mode, Beekeeper tries the same things ssh does, in this order, and uses the first one that works:
- SSH agent. Whatever your
SSH_AUTH_SOCK(or PuTTY's pageant on Windows) is advertising. IdentityFilefrom~/.ssh/config. Used if the matchingHostentry has one. HonorsIdentitiesOnly yes— when set, the agent is restricted to keys whose public part matches anIdentityFile.- Default key. The first of
~/.ssh/id_ed25519,~/.ssh/id_ecdsa,~/.ssh/id_rsa, or~/.ssh/id_dsathat exists.
When you select Automatic in the form, a small status row appears under the dropdown: SSH agent › SSH config › Default key. Each pill shows a check or x and reveals the discovered path on hover, so you can see at a glance which step will satisfy the connection.
If you'd rather skip Automatic and pick a key explicitly, choose Key File and select the key yourself.
Other authentication methods
- Key File — uses the SSH Private key File you select (and optional Key File PassPhrase). Beekeeper does not fall back to
IdentityFilefrom~/.ssh/configin this mode — picking Key File means you want this specific key. Hostname/port/user from~/.ssh/configaliases still apply. - Username & Password — uses the form's SSH Username and SSH Password. Hostname/port/user from
~/.ssh/configaliases still apply; no key files are tried.
Bastion (jump) host
The Bastion section repeats the same three authentication modes (Automatic, Key File, Username & Password) with the same behaviour. The bastion is visually nested under the SSH section to make it clear that the bastion's credentials connect to the bastion, while the outer SSH fields connect to the target through it.
Using ~/.ssh/config
You can type a Host alias from your ~/.ssh/config into the SSH Hostname or Bastion Host field. Beekeeper resolves the following keys from the matching entry, regardless of which authentication mode you picked:
| SSH config key | What Beekeeper uses it for |
|---|---|
HostName |
The actual hostname/IP to connect to |
Port |
The SSH port |
User |
The SSH username |
IdentityFile |
The private key (Automatic mode only — step 2 of the auth chain) |
IdentitiesOnly |
If yes, restricts the agent to keys matching IdentityFile (Automatic mode only) |
For example, given this entry:
Host production
  HostName db.internal.example.com
  Port 22022
  User admin
  IdentityFile ~/.ssh/prod_ed25519
  IdentitiesOnly yes
Type production into the SSH Hostname field, leave the other fields blank, pick Automatic as the auth method, and Beekeeper will fill in the rest — connecting to db.internal.example.com:22022 as admin, restricted to the agent identity that matches prod_ed25519.
When you also enter a value in the form, the form value wins — ~/.ssh/config only fills in the fields you leave blank. The hostname itself is the one exception: an alias is always resolved to its real HostName so the connection can be made.
What is not read from ~/.ssh/config
To keep things predictable, Beekeeper Studio only reads the keys listed in the table above. Other directives (ProxyJump, ProxyCommand, ForwardAgent, LocalForward, RemoteForward, Match blocks, included files, etc.) are ignored. If you rely on ProxyJump, configure the bastion host explicitly in the connection form.
File Associations
Beekeeper Studio provides file associations so you can do the following things without opening the app:
- Double click a sqlite
.dbfile in a file browser to open it in Beekeeper Studio! - Open URLs and files from the terminal:
- Mac:
open postgresql://user@host/databaseoropen ./example.db - Linux:
xdg-open postgresql://user@host/databaseorxdg-open ./example.db